Set or reschedule lead events, helpdesk tasks, and calendar events by using language like "next Monday".
This will it make it easier and faster to set tasks but you can still always use the handy calendar picker.
For example, in order to set an appointment for next Monday at 4 pm, you can simply write "Monday @4pm" in the date/time box, and the picker will automatically translate the entered text to the standard date and time format.
Here are several other examples of the terms the calendar text box can understand:
- In 30 minutes
- In 1 hour
- +2 hours
- Today @11am
- Day after tomorrow
- Next week @2pm
This is available on:
- Lead events (appointments and tasks)
- Helpdesk ticket tasks
- Calendar appointments and tasks
- Scheduling/Rescheduling emails from the Lead or from the Merchant profile page
Example of Usage
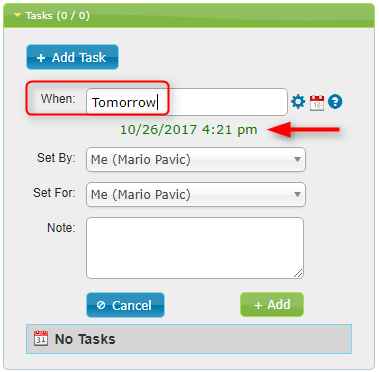
If you enter the term "Tomorrow" in the date/time box in the Lead Appointment widget, the term will be automatically translated to tomorrow's date and time (exactly 24 hours from the moment that you entered the term).
The translated date and time will then be shown in green letters just below the date/time box:

If the date/time shown in green is not exactly what you wanted, you can edit the time by opening the standard Calendar Date Picker via the Calendar icon:

The Calendar Date Picker will be automatically set to the date and time that was translated from the text you entered, and you can now use the hour and minute sliders in order to select a more precise time for your appointment:

If the term you entered is not recognized (e.g. if it contained a typo, or is otherwise not a recognizable text), then you will see the "Not a valid date/time" message shown in red letters right below the date/time box:

If you frequently use the same set of terms when setting your appointments then you can save those terms in your user settings and access them from the Custom Dates popup.
The Custom Dates popup can be opened by clicking on the gear icon from the Appointment widget:

Once it is open, you can click on any of the saved terms and the term you select will be copied to the date/time box automatically. If you wish to add a new term to the popup, click on the gear icon:

Your User Settings page will open and show the Custom Dates tab. You can now enter your new event time term at the bottom of the custom dates list:

If the new term you entered is a valid term, you will see a "Valid Date" confirmation text and you can then click on the "Plus" button to the right in order to save the new term:

Once you go back to your Custom Dates popup, you will find the new term at the bottom of the list:
