Your CRM Calendar enables you to easily manage your daily activities and those of your team. For additional convenience, you also have the ability to sync your CRM Calendar with Google or Outlook Calendars.
You may create Calendar tasks or appointments both on the Calendar page and on the Lead. If needed, you may also export your calendar events to other external calendars manually.
The Calendar Page
To open the CRM calendar, click on the Calendar button on the top navigation bar:

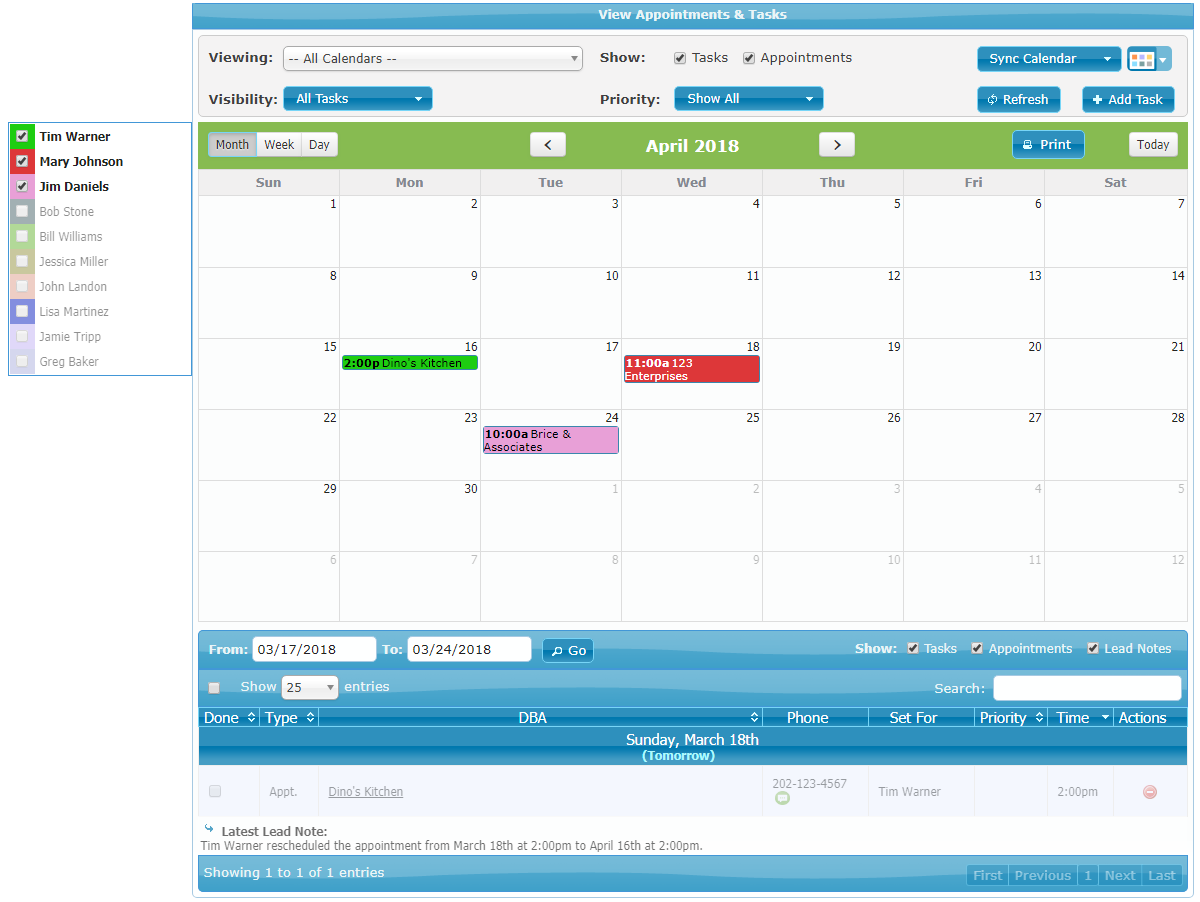
Below is an example of the Calendar page:

Calendar Filters and Options
The top part of the Calendar page displays the calendar's filters, settings, and actions:

Here is an explanation of the available calendar options:
- Viewing — Select a specific user's calendar, or view all available calendars.
- Visibility — Show completed, incomplete, or all tasks.
- Show — Show tasks, appointments, or both.
- Priority — Show events with all priority levels or only high/medium/low priority events.
- Sync Calendar — Sync your CRM Calendar with Google or Outlook calendars.
- Calendar/List View — Select the "Calendar View", the "List View", or both (using the button next to the Sync Calendar button).
- Refresh — After selecting your filters hit Refresh in order to reload the calendar.
- Add Task — Add a new Task or an Appointment.
The Calendar View
By default, the Calendar page will show both the Calendar View and the List View.
To display just the Calendar View, select the Calendar View option in the top-right corner of the Calendar page:


The Calendar View displays upcoming events in boxes which are color-coded for each user:

On the top of the Calendar View, you will find the options for:
- Switching between the Month/Week/Day calendar views
- Navigating the calendar months
- Printing the current calendar page (using the Print button)
- Jumping quickly to the current date (using the Today button):

To the left of the Calendar View, you will wind the user-selection widget which allows you to easily select the user calendars you wish to view:

The Calendar List View
To display the Calendar List View select the List View option in the top-right corner of the Calendar page:

The Calendar List View shows your calendar events in a tabular form:

Use the options on top of the table to select a date range for your report, and to show or hide items such as tasks, appointments, and lead notes from the report:

To locate a specific item faster, enter a search phrase in the Search box in the top-right corner and press Enter. The report will then display the matching results:

To view more details on a specific event or to edit an event, click anywhere on the event table row and the event detail window will pop up:

When you select one or more events using the checkboxes next to the event's names, the Mass Actions button will automatically appear in the top-left corner.
You can use the Mass Actions buttons to perform mass actions on the selected events:

The user-selection widget shown to the right of the List View allows you to easily select the user calendars you wish to view:

Adding a New Task/Appointment on the Calendar
To add a new task or an appointment click on the Add Task button:

Alternatively, if your Calendar View is opened, click on any box in the view and the Add Task dialog will pop up (with the date of the box you clicked on automatically selected in the dialog):

Fill in the task or appointment details and when finished click Add. Your new event will now be saved and it will appear on the calendar.
Note: If your event is related to a specific lead, you can link the event to the lead by typing the name of the lead in the Link Lead field. As you start typing, a picklist will appear automatically and present you with the matches to choose from:

Adding a New Task/Appointment from the Lead
To add a task or an appointment from the Lead, click on the Add Task or the Add Appointment button in the Tasks widget:

Next, fill in the event details and click Add:

Your new event will now be saved and you can view or edit it right in the Tasks widget:

The new event will also be shown on the Calendar page.
Editing and Rescheduling Tasks/Appointments
To edit an Appointment or Task click on the event in the calendar and the event settings will open up in a pop-up window:

You can also open the event settings by clicking on the event's row in the List View:

Here is an example of an Appointment edit window:

Use the buttons at the bottom of the pop-up to delete, reschedule, or edit the event:

When the pop up is in the edit mode, you can change the task note, select a different "Created For" and "Created By" user, and mark the event as done (by clicking on the red "X" icon):

You can also add new lead notes or view existing notes right from the pop-up:

Each task or appointment may be exported to an iCal, Outlook, Google, or Yahoo calendar file by clicking on the export links shown at the bottom of the pop-up window:
