The Westamerica integration enables ISOs to automatically upload lead documents and data to Westamerica's SFTP server once the lead is moved to a designated status state.
The file upload automation is achieved using a combination of lead status states, lead document labels, scheduled jobs, and the Westamerica SFTP file transfer configuration.
To set up the Westamerica integration, you'll need to create a custom status state (or states) and custom document labels for Westamerica documents. Sales reps can then tag lead documents to be uploaded to Westamerica with appropriate document labels.
When the documents are ready to be sent, the sales rep simply moves the lead to a predetermined status state. The scheduled job created to monitor the Westamerica status states then picks up on the new lead in the assigned status state, and begins uploading the documents and field data from the lead to the bank's SFTP server.
In addition to uploaded documents, the CRM automatically generates a CSV file that contains the additional lead information that is required by the bank (such as the merchant MID, DBA name, and others).
The CSV file is saved in a zip file along with the other lead documents and then uploaded to the bank's SFTP server.
Continue reading to learn how to configure your Westamerica Bank integration with step-by-step instructions.
Enabling Your Westamerica Integration
To enable the Westamerica Integration on your site follow these steps:
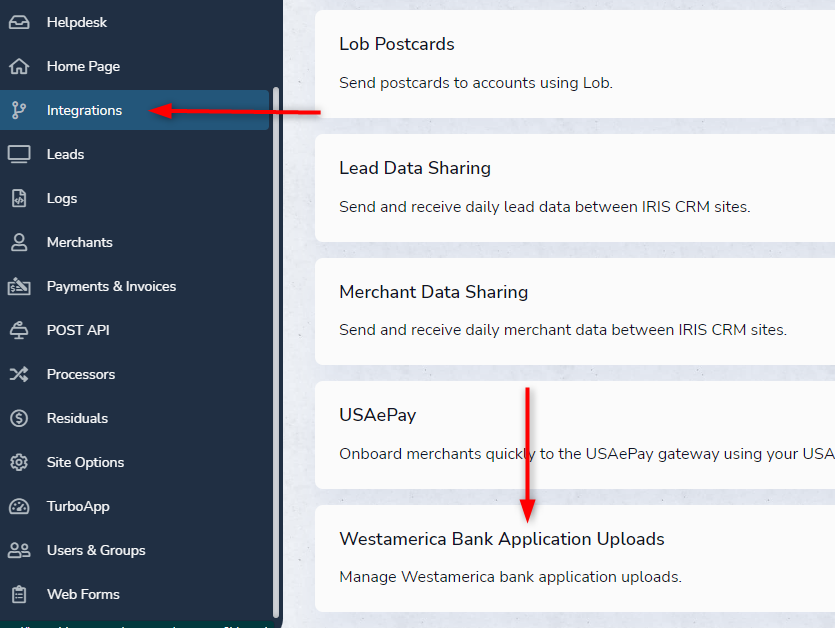
1. Navigate to Manage > Administration > Integrations >Westamerica Bank Application Uploads:
2. Click on the "Set Up File Transfer With Bank" button and complete the required file transfer settings in the popup window that appears:
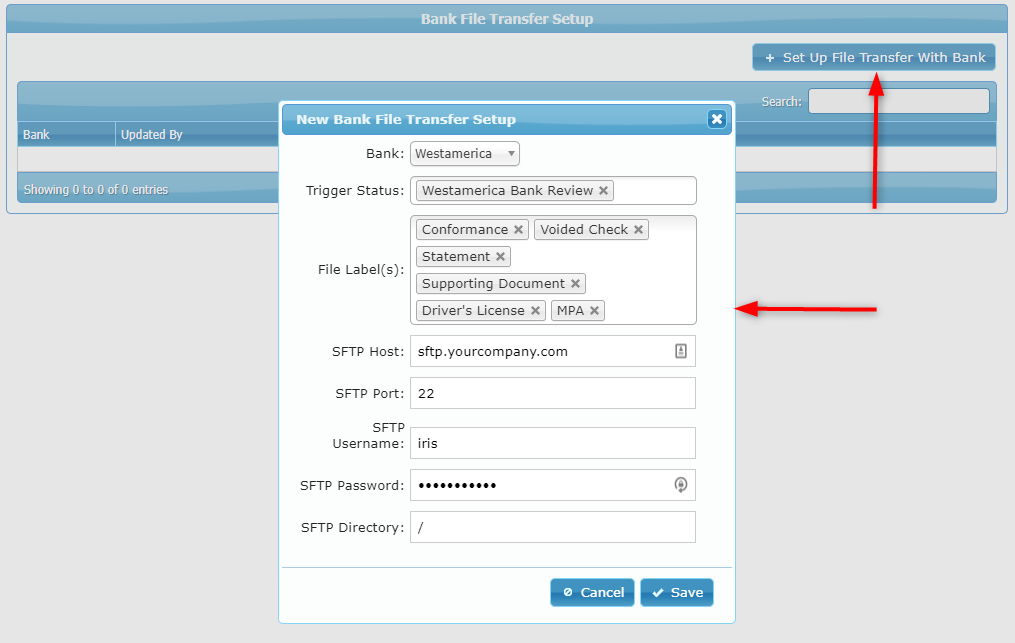
Below is a description of the transfer settings:
- Bank: The bank that the documents will be uploaded to.
- The Trigger Status(es): Leads moved into these status states will be processed with the next run of the scheduled file transfer job. More info: Status States
- File Label(s): Lead documents tagged with these document labels (for example 'Voided Check', 'Driver's License', or other custom labels) will be automatically added to a zip file which is then uploaded to the bank's SFTP server via the scheduled file transfer job. More info: Document Labels
- SFTP settings: These are your bank's SFPT settings.
3. After you enter the required settings click the Create button, and the new file transfer configuration will be created.
You will now be routed to the Field Mapping page, as shown in the below screenshot:
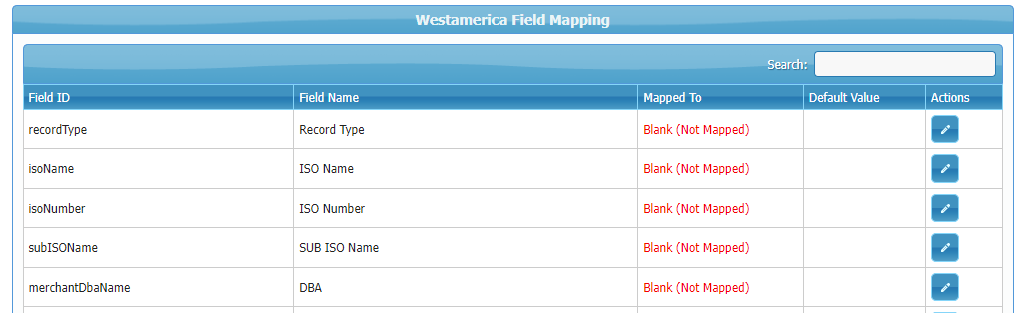
This is the page where you can map your lead fields to the fields required by Westamerica.
Based on this mapping setup, the system generates a CSV file with the lead's information that will be uploaded to Westamerica in a zipped file, along with the other documents tagged for upload.
To map a field simply click on the pencil icon for that field, and select a lead field in the popup window that appears:
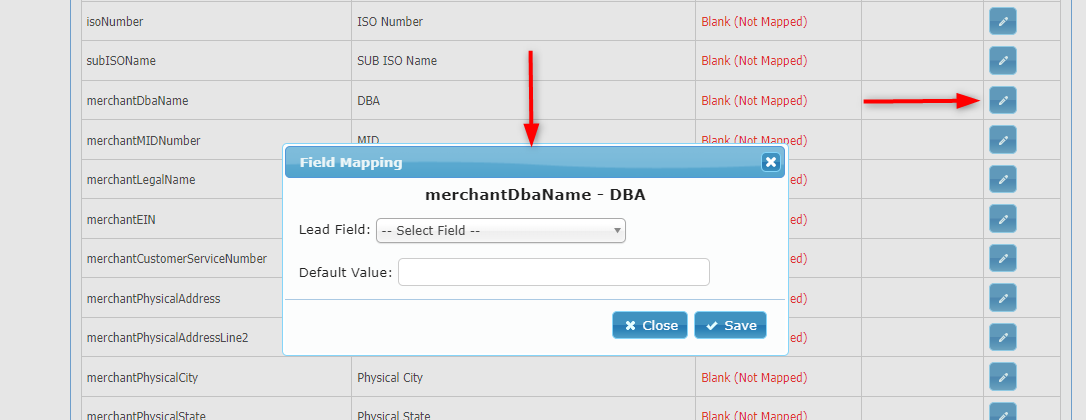
You can optionally set a default value for the field. This can be helpful so as to prevent potential errors from coming up during the file upload due to missing field information.
After you save the field mapping it will be shown on the mapping page as seen in this example:

Important: The first four fields on the mapping page (recordType, isoName, isoNumber, and subISOName) don't need to be mapped, but you can only map the remaining fields on the page.
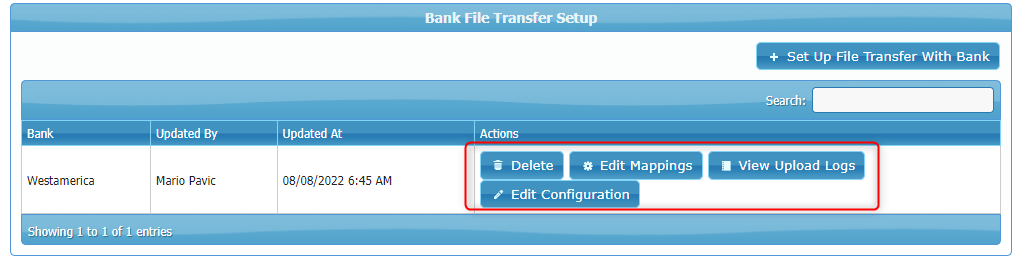
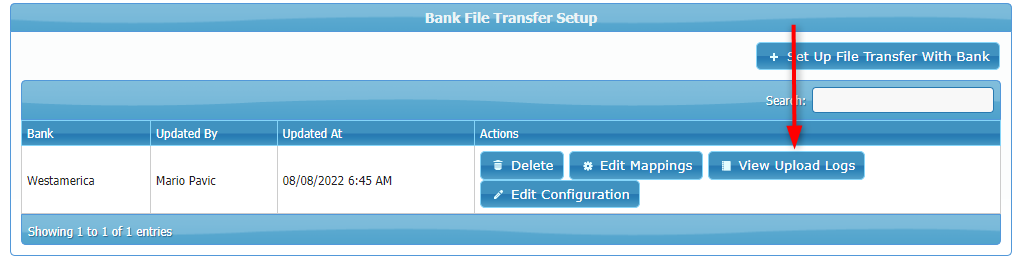
4. Your file transfer setup is now created and you can manage it from the main setup page:
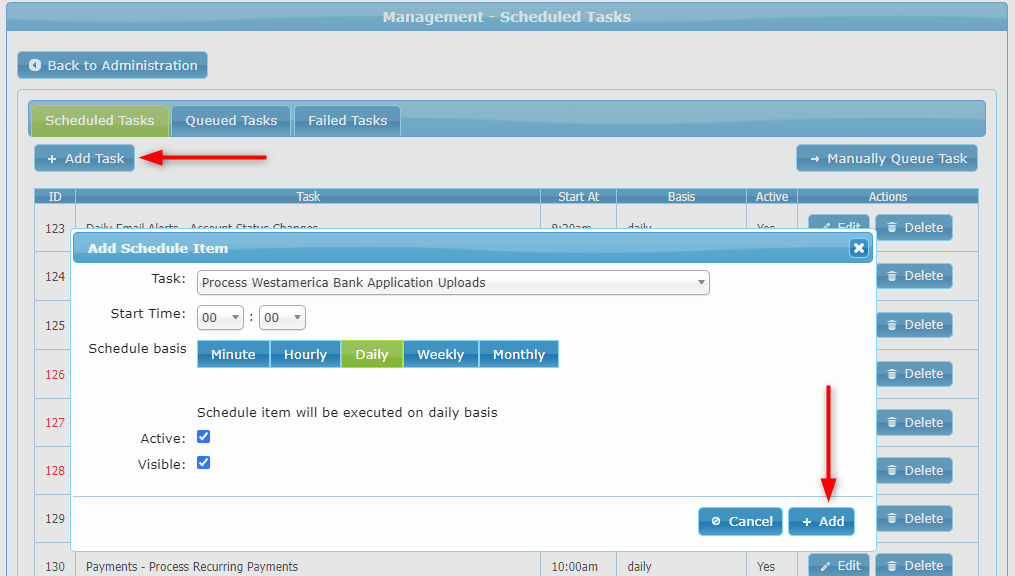
5. As the final step of the integration setup, you'll need to create a new scheduled task to upload the lead documents on a preset schedule.
Navigate to Manage > Administration > Site Options > Scheduled Tasks, and click the Add Task button.
In the popup window that appears select the "Process Westamerica Bank Application Uploads" task, select the schedule option (eg. hourly) and click Add:
Once the scheduled task is created the system will begin to monitor for any new leads appearing in the designated status state.
If new leads are found, the system will begin to upload the lead documents to Westamerica based on your file transfer configuration.
Transferring Lead Documents To Westamerica
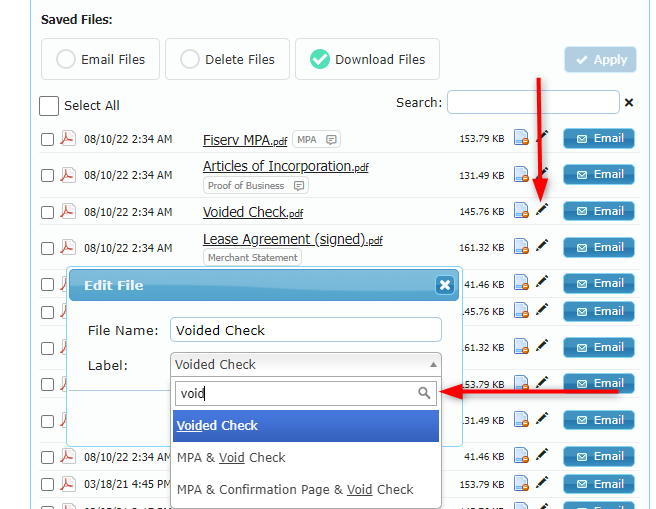
To transfer lead documents to Westamerica Bank the sales rep can begin by tagging the documents with the appropriate labels on the lead Attachments tab:
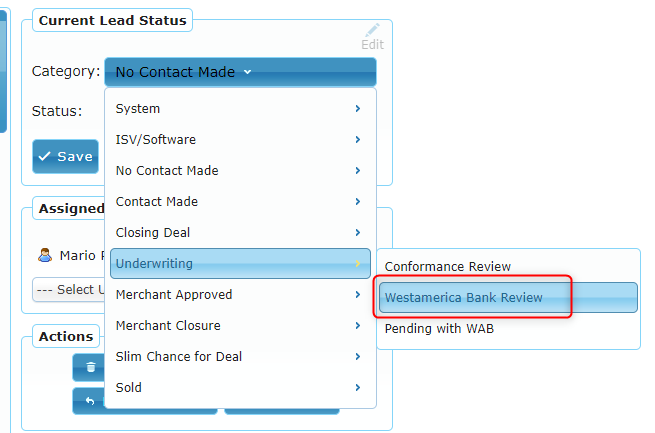
When the documents are ready to be transferred, the sales rep simply moves the lead to the assigned Westamerica status state:
From there, the schedule task will pick up on the lead on the next run, and upload all of the tagged files to Westamerica's SFTP server.
Viewing Upload Logs
To view the upload logs click on the "View Upload Logs" button on the setup page:
The upload logs are now shown sorted by date range:
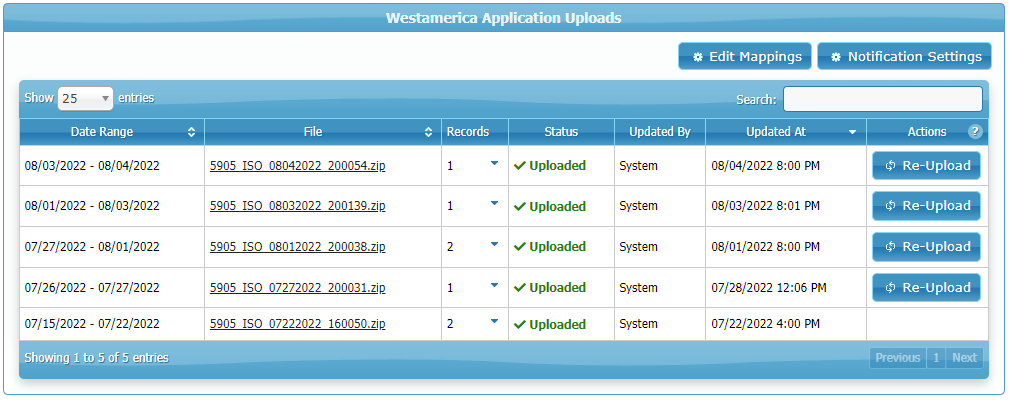
Click on the links in the File column to download and view the documents that have been uploaded to Westamerica's SFTP server.
If needed, you can also manually reupload the documents using the Re-Upload button in the Actions column.
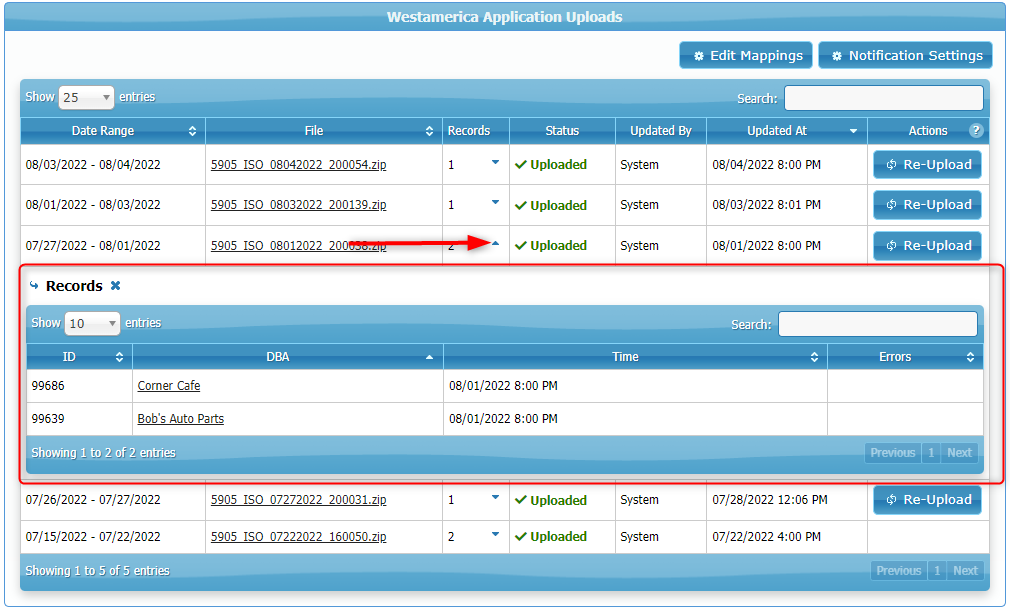
To see more detail on the each upload job including potential upload errors, click on the triangle icon in the Records column:
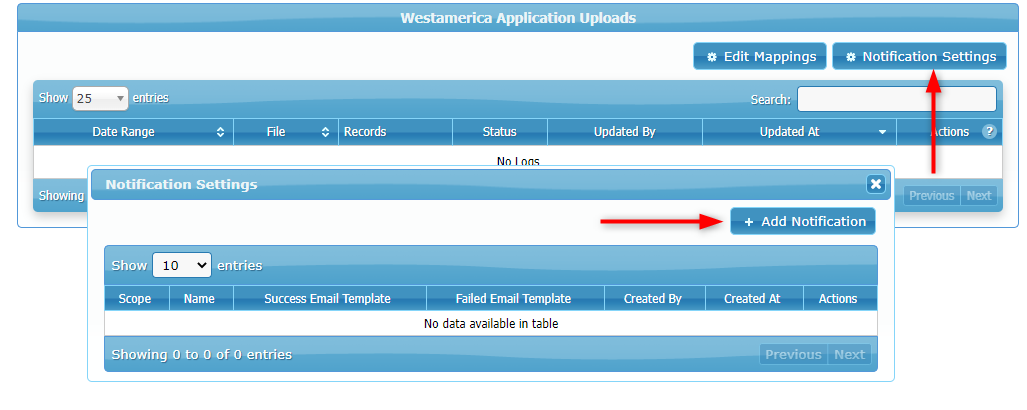
Setting Up File Upload Notifications
The Westamerica integration also allows you to configure email notifications for both successful or failed uploads initiated by the scheduled task.
To set up email notifications click the 'View Upload Logs' button on the file transfer configuration:

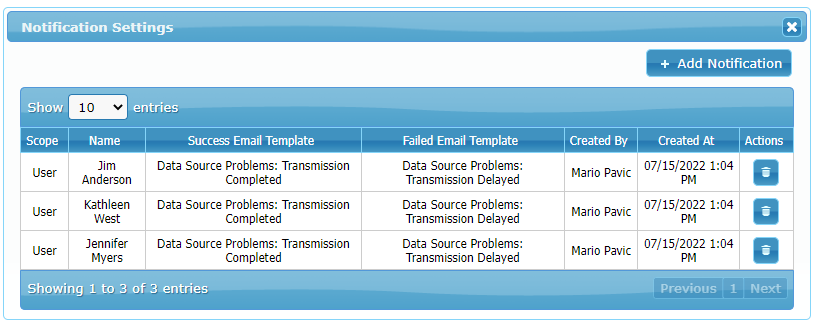
Next, click Notification Settings and Add Notification:
In the popup window that appears, select the users and/or user classes to notify, select the email templates to send for successful and failed uploads, and save your changes:
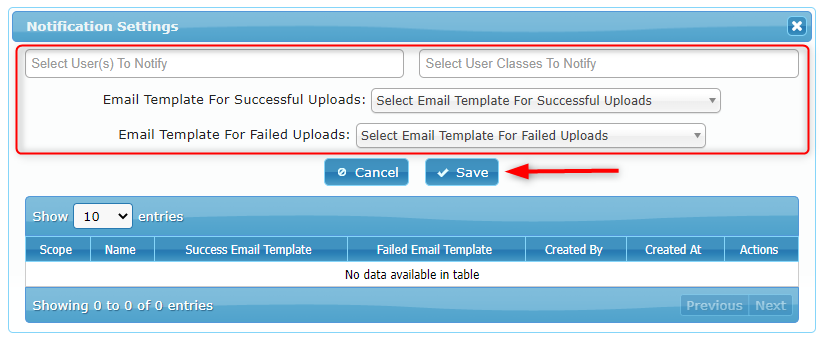
The popup window now shows the save notification settings: